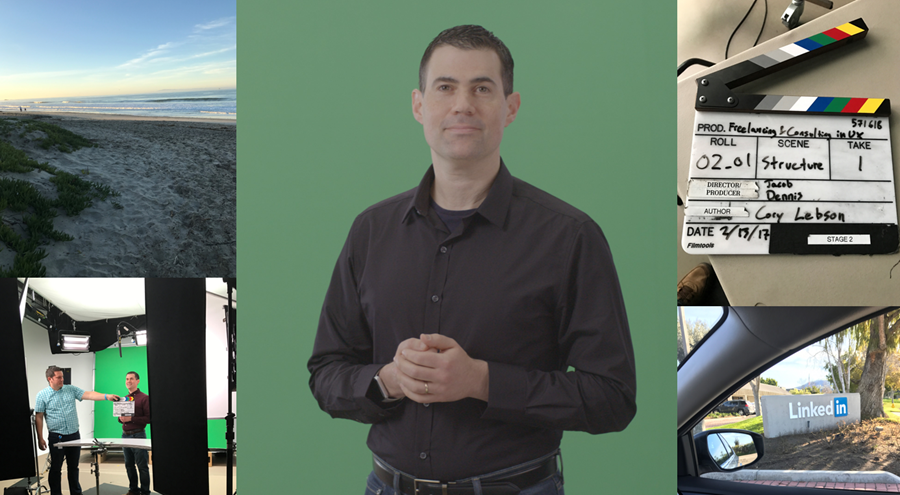
Right at the anniversary of my first Lynda.com / LinkedIn Learning course, I had the opportunity to head out once again to sunny Carpinteria, California. I got to record two new courses, both focused on a topic near to my heart – being a freelancer!
My first course, Planning a Career in User Experience (UX), has done extraordinarily well, with over 320K views in the first year. Yet when recording the first course, I remember that it took a little bit of time to get into the groove and within the course videos themselves, there were some live action videos while others were done in a sound booth.
Live action!
This time, I was much more prepared for the experience and was excited that I’d be doing my two new courses entirely in live action. Live action is a much more social experience, as the recording studio was staffed by Dennis the producer, Jacob the director, and Cody to make sure that my script on the teleprompter stayed in sync with me.
Speaking engagements vs. video
I frequently have UX speaking engagements, and I usually treat the talks almost like improv. I outline in advance some of the basic concepts that I want to talk about, but then come up with related anecdotes or additional ideas on the fly. In this way, each talk is a bit different, and I honestly don’t know the full details about what I’ll talk about until I say it. This helps keep me on my toes and lets me give the same talk to different audiences in different cities and still enjoy myself.
But reading from a teleprompter on camera is an entirely different experience. There is a lot of time spent coming up with an exact script and iterating before even heading out to Carpenteria. For further refining, a “mumble read” is always done before the camera starts rolling. I’d read through the entirety of the script and we’d listen for things that seemed okay in writing but just sound a bit funny when immersed in the actual experience.
This time, while more comfortable with the overall experience, I still had a lot of lessons learned. I’m documenting them here not only for next time, but for other Lynda.com / LinkedIn learning authors, as well as really anyone who wants to know what goes on behind the scenes!
Lessons learned: Teleprompter Script
Lower reading level than you may think: I wrote the initial script the same way that I’m writing this post. Although I inherently understand that we don’t necessarily write and speak the same way, it was surprising how much simpler I needed to make the teleprompter script. It needed to sound like an impromptu discussion instead of a read of an article.
Lessons learned: Comfort and Fashion
Comfort is important! Even as someone who works out regularly, I remembered from my first experience that standing in place for hours on end can make you achy. So I wore my most comfortable Levi’s Stretch denim jeans and trusty Rockports with good quality insoles. Still achy – particularly after 3 days of filming – but at least I was as comfortable as I could be.
Consider how fitted your clothing is: I brought a bunch of button-down shirts last time and the one that the Lynda.com team liked most was a black shirt. But they felt that it would look better on camera if it was a bit more fitted, so I did the live action from the first course with a slightly uncomfortable large clamp in my back. In the intervening year, I’ve replaced a few button down shirts, and as fashion has gradually gotten more fitted anyhow, I was able to present them with some more fitted options this time – no clamps needed!
Lessons learned: Speech and Intonation
Find a way to indicate emphasis: The teleprompter is plain-text only. When I wrote the script, I used asterisks to indicate words to emphasize. As I was actually recording, I realized that ALL CAPS was faster for me to absorb than asterisks, so we changed things and also added more emphasis points throughout during the mumble read.
Slow does not mean low energy: Going into this, I realized that I equate “high energy” with faster speech and “low energy” with slower speech. For the best recording, I needed to remind myself (and asked to be reminded at the start of every video) to speak extra slowly but with high energy. I got the hang of it eventually, but it was a learning curve for me. I’m going to continue to experiment with this a bit the next time that I give an in-person talk.
Extra pauses for comprehension: After making key points, I also learned to pause a bit longer for, as Dennis put it, time for the learning to sink in. This lesson certainly has some in-person value too!
Allow time to breathe: I also learned that I naturally breathe between sentences, at least on camera. I have never found breathing points to be an issue with regular in-person presentations, but here it became something that I needed to think about as I was carefully monitoring the steady flow of my speech. This helped reinforce shorter sentences, some of which we adjusted on the fly or cut up into un-grammatical breakpoints, to allow proper breathing points. (The rule of thumb we learned is that for me, no more than two lines with 11 pt Calibri for optimal breathability!)
Lessons learned: Body Language
Pay attention to your hands: I naturally speak with my hands. And when I’m doing in-person presentations, this is truly natural. I use my hands and arms liberally, and in fact my whole body, to make points and emphasize ideas. However, with a camera and teleprompter, my body had to remain reasonably stationary, which then caused me to remain more still than I would have otherwise. I had to balance not moving my body too much with hands that remained at bellybutton level in a “neutral” position and then came out in moderation.
Also, although I never really realized it before, when I speak in person I use my hands and my body to pantomime ideas. But now, I had to use quasi-natural gestures that could not quite convey a story in the same way. I can’t say that I ever fully got used to this, but I could do it well enough to have it look reasonably good on camera. One evening when I got back to my hotel, I was watching John Oliver and paid attention to his hands. I realized that he has a great balance of hand movement and communication.
Smile for the camera! When speaking in person, I get my energy from those that are in the audience. Not only do I get my energy from the audience, but I also will instinctively shift what I’m going to say to sync with the room. And it’s so easy for me to smile if I’m syncing up with someone who is already smiling versus forcing a smile on my own. But the camera and the teleprompter never smile. So it took effort to start and end every video looking reasonably happy. It definitely helped that whenever I looked at Dennis he would smile to remind me to start with a smile. I could much more naturally smile back.
Keep moving to maintain energy: The filming time kept me pretty much in the same place. However, when the cameras were not rolling, particularly during the prep for the next video, I found that bouncing around a bit as well as lots of stretches helped keep me not only more comfortable as I was standing there, but also helped keep my energy up.
Find your optimal caffeine intake: While I typically have 2 or 3 cups of coffee a day at irregular intervals, I found that for this type of work, carefully spacing out my caffeine intake to one cup of coffee every 2 – 2.5 hours helped keep me focused on the recordings at hand.
Stay tuned!
Hopefully this post provided you with some insight into what goes on behind the scenes at Lynda.com as well as provided some insight into what you should know if you’re ever in front of a teleprompter for a video recording, Lynda or otherwise.
And in addition to my existing UX careers course at Lynda, stay tuned for the two new freelancer courses coming soon!


